Little HDR guide for beginners
Wow, another HDR guide?Yes, because a lot of people everyday start to enjoy HDR and because my friend Hector , a very talented digital photographer always ready to learn interesting things, asked to me in the past about it. The difference between this very little guide and the others on the Web is probably the software I used: Dynamic Photo HDR for Win or OSX, not the really famous Photomatix; I found the one from Mediachance really fantastic, please buy it if you want to create wonderful HDR (Photomatix is good too, but I think it’s more difficult to get good results at first time, I tried it after some practice).
First of all we need an image: IMHO not every image is good for HDR and the most important thing is to choose the right image to process. We need something with lights and shadows, maybe taken during the day (night HDR is really complicated and often useless) and with clouds. You have two possibilities: take various shots of the same thing at different exposures (at least 3: one with nice exp, one underexp and one overexp; a lot of people uses 5 images, with two different underexp and two different overexp) or take a single, hi-quality image (the best your camera can) and modify by using a photo editing software (you know, Photoshop/Photoshop Elements is the right choice if you can, but you can also use the lovely Gimp or others:-)) for create and save other files with different exposures (for example in Photoshop the command is “Image->Adjustments->Exposure”; at this point create 2 files from the original, one with -2 and one with +2 exp and save them in the same directory of your photo).
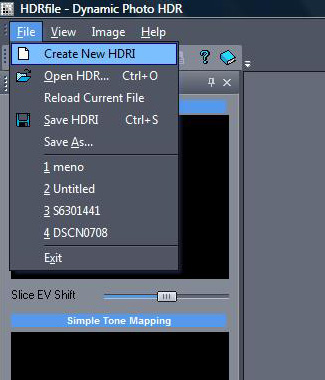
Open Dynamic Photo HDR and click on the menu to create a new HDRI:

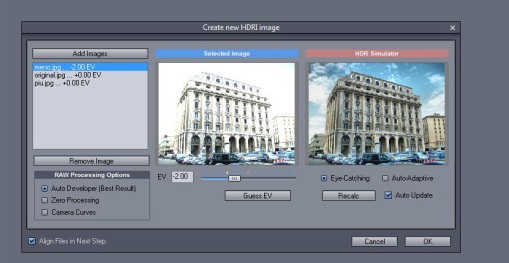
In the next step, click on “Add images” in the window and select your 3 files; remember to choose the right exposure for each of them (-2, 0, +2 like before) , deselect “Align files in next step” and click “OK”.

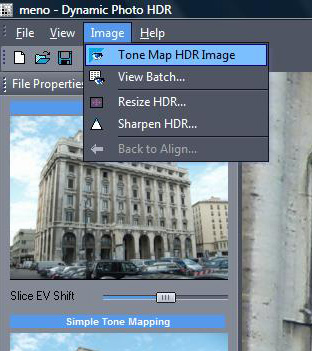
After some seconds the HDR image is produced, but we need immediately to “Tone Map” it to obtain a good result.

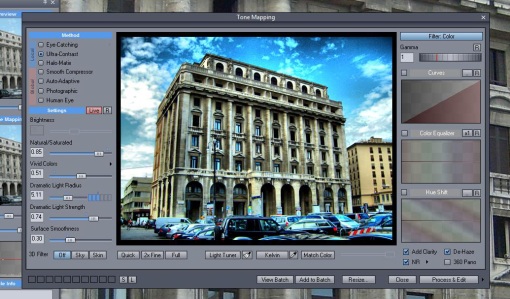
This is the funniest part and the creative one: in this menu you can choose some templates: the perfect one for the “wonderful HDR images you can see everywhere on Flickr” is “Ultra-Contrast”:-). Now start to play with settings, pump up “Natural/Saturated” and “Vivid Colours” and eventually increase/decrease the “Dramatic” ones (it depends by the image). Probably you need to turn off the “3D filter” and add “NR” (Noise Reduction) for a good job.

After clicking “Process & Edit” you’ll see a window with your final image and some buttons for little editing: click on the upper left menu and select “Save as”; choose always the maximum quality.
Now you’ll have a nice image, but it’ll be probably full of horrible pixels, especially in the sky and in the most luminous parts.
![]()
Let’s come back to your photo editor, open your HDR image and apply some “Blur” filter to those parts. For example in Photoshop select the affected zones with “Magic Wand” or some “Marquee Tool” (better, because with Magic Wand you often cannot select the 100% of pixels)and apply a “Gaussian Blur” filter with a 3,o/4,0 pixels radius. You can now try to increase/decrease saturation and other settings inside your photo editor like a normal image and also apply a dark canvas to maximize dramatic effect. Voilà!
-
Archives
- December 2010 (1)
- February 2010 (2)
- January 2010 (1)
- December 2009 (2)
- November 2009 (2)
- October 2009 (3)
- September 2009 (2)
- August 2009 (2)
- July 2009 (3)
- March 2009 (1)
- February 2009 (1)
- January 2009 (1)
-
Categories
-
RSS
Entries RSS
Comments RSS


